Summary
- Connecting the ROG Ally X to a TV is straightforward through an HDMI-to-USB-C cable or a dock.
- Docking tips: set game resolution, use FSR for better performance, and connect controllers.
- Setup as many settings as possible before you connect the ROG Ally X to your display (like connecting a Bluetooth controller, for example).
One of the best things about handhelds like Asus’ ROG Ally X and the Steam Deck OLED are how they allow you to connect them to a television or monitor. While the process of connecting the Steam Deck is very Switch-like and straightforward, things get a little more complicated when it comes to my ROG Ally X, given that it’s powered by Windows 11.
With that in mind, I’ve come up with a few tips and tricks to streamline things, including easily connecting a controller, setting the resolution, making sure my dock is charging my ROG Ally X, and more.

Related
This $35 accessory turned my ROG Ally X into my main gaming device
Jsaux’s 6-in-1 Multifunctional Docking Station is one of the most full-featured, cost-effective handheld game console docks available
1 Invest in a dock or a compatible HDMI-to-USB-C cable
These adapters range significantly in terms of price and features
If you want to take the straightforward route, you can connect the ROG Ally X directly to your TV or monitor with an HDMI-to-USB-C adapter. I actually do this in my basement office when I want to play the handheld on my monitor, though the cable I use is USB-C-to-DisplayPort, which gives me access to higher resolutions and refresh rates like 4K/120Hz.
This is the same cable I use to connect my M3 Pro Max MacBook Pro to my 144Hz-capable LG Ultragear 27GP950-B monitor, so it’s already connected to my monitor, making it very convenient. That said, because I’m not using a dock, I also need to plug a USB-C power cable into the ROG Ally X (this means I don’t have any additional ports to connect a mouse and keyboard if I need to, unless I ditch Logitech’s dongle system and use Bluetooth). Given the handheld has two USB-C ports, this is really easy to do compared to the Steam Deck, which requires some sort of USB-C dock or dongle to make this happen, since it only has one USB-C port.

JSAUX 6-in-1 Multifunctional Docking Station
$35 $46 Save $11
As far as handheld docks go, the Jsaux 6-in-1 is one of the best out there thanks to its HDMI 2.1 port, two USB-A ports, single USB-C port, Ethernet, and 100W power passthrough.
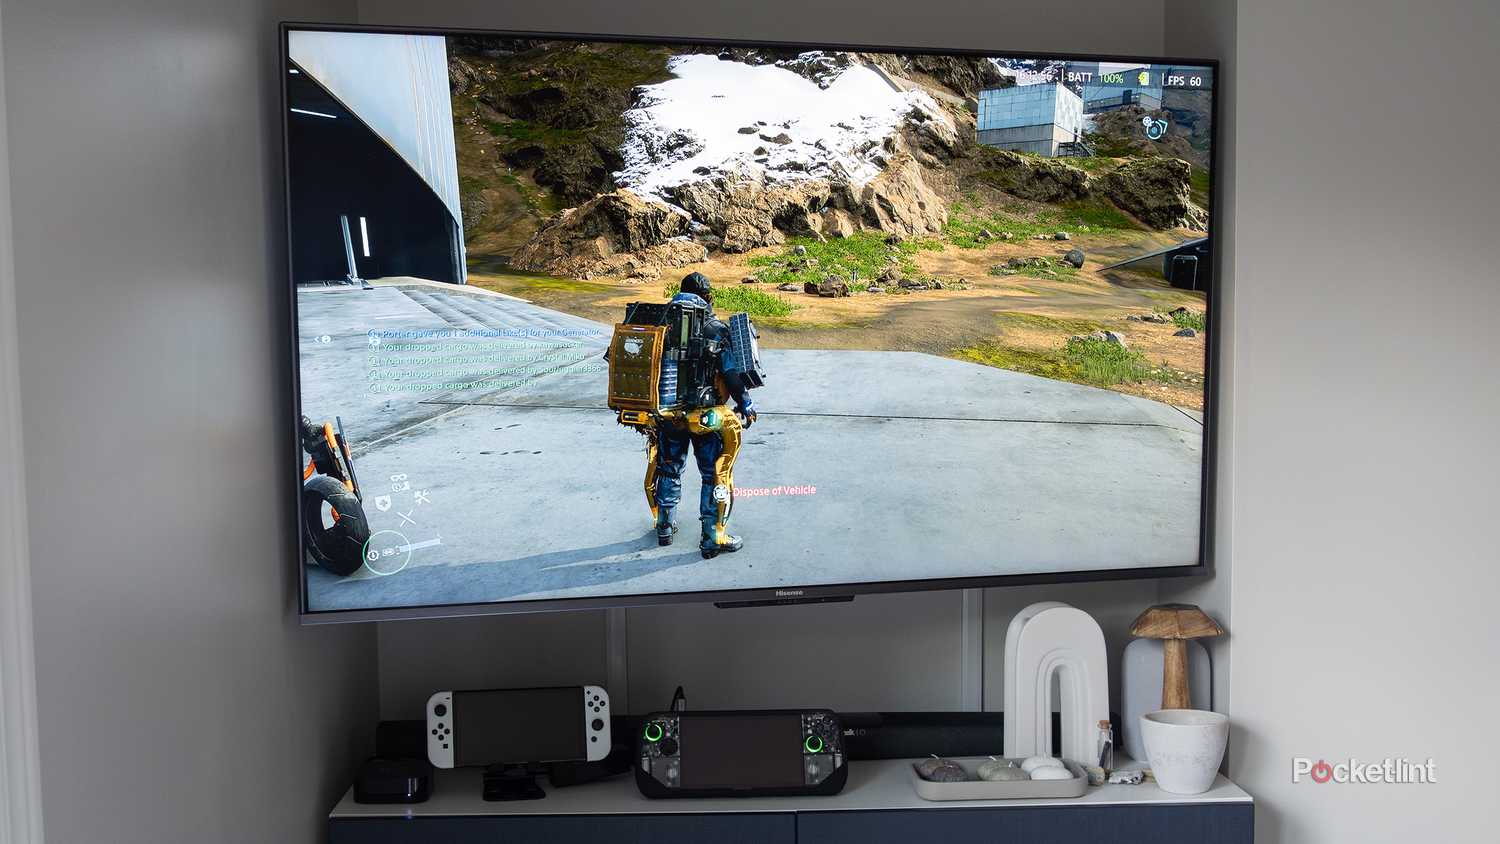
When I want to game on the TV in my living room with my ROG Ally X, which is something I’ve been doing pretty often lately as I work towards finishing Death Stranding before Death Stranding 2 releases in a few months, I rely on Jsaux’s 6-in-1 Multifunctional Docking Station with its pass-through power plugged into the ROG 140W USB-C GaN charger. Of course, I can accomplish the same thing with the USB-C-to-DisplayPort cable I use in my office, but I appreciate the dock’s convenience since it’s always sitting there and ready to go. It also makes it easy to move the ROG Ally X between my office monitor and my living room TV since I have two easy-to-access setups. As a bonus, using the dock gives me access to additional USB ports if I want to use my mouse or keyboard with my ROG Ally X, though I rarely do this in my living room.

Related
The ROG Ally X is great, but the Steam Deck OLED easily beats it in 4 key ways
I like the ROG Ally X, but when it comes to on-the-go gaming, I find myself turning to the Steam Deck OLED – here’s why.
2 Follow these steps to connect your ROG Ally X to a display with a cable or dock
Check out these straightforward step-by-step instructions

If you’re looking for straightforward instructions, don’t worry, I have your back. It’s a simple process, but if you’re unfamiliar with the wild world of cable adapters and docks, it can quickly get confusing. Below are all the steps you need to take to connect your ROG Ally X to your TV or monitor:
- Plug your HDMI-to-USB-C cable into one of the ROG Ally X’s USB-C ports (if you want to keep your ROG Ally X charged, make sure you have a power cable plugged into its other port). If you’re using a dock, plug the video out USB-C cable into either of the ROG Ally X’s USB-C ports.
- Connect the other end of the HDMI cable to your TV or monitor. If you’re using a dock like Jsaux’s Multifuctional Docking Station, make sure you have your TV or monitor’s HDMI cable plugged into the correct input.
- If you’ve done everything correctly, the ROG Ally X should automatically connect to your TV/monitor, and you’ll see the Windows login screen (the display on the ROG Ally X will typically flash once before moving to your external monitor). If you have a passcode or fingerprint set for your handheld, you’ll need to type that in (I often go through this step before connecting the ROG Ally X to my display).
- Next, tap the Armory Crate SE button to launch the ROG Ally X’s unified user interface app. You can now select the game you want to launch, and you’re ready to game away on the big screen.
If you want 4K/120Hz output as an option, make sure you’re using an HDMI 2.0 cable, or, like me in my basement office, an HDMI-to-DisplayPort cable. Also, ensure you’re plugging your HDMI 2.0 cable into a 4K/120Hz compatible HDMI 2.1 port on your TV. With my
Hisense U8H Mini-LED TV
, this is port three or four.

Related
I wasn’t expecting the ROG Ally X to outshine the Steam Deck quite this much
Both gaming handhelds have specific strengths and weaknesses, but generally, the ROG Ally X reigns supreme.
3 Tweak your settings and connect a mouse or controller
Connecting the ROG Ally X to a display is easy — it’s what comes after that can get annoying

Over the past few months, there are a few things I’ve noted about playing the ROG Ally X in docked mode. First off, sometimes it makes sense to change the resolution in-game when you’re playing on a bigger display. I typically just stick with 1920 x 1080 pixel resolution (1080p) since that’s what most games I play run reasonably well at already in handheld mode, but if you’re playing a less intensive indie game, you might want to kick things up to 4K with a higher refresh rate (I do this with Tunic, for example).
Speaking of higher refresh rates, taking advantage of AMD FidelityFX Super Resolution (FSR) can really help kick up the frame rate in both handheld and in docked mode. For example, I’ve been able to consistently get 60-70fps when playing Death Stranding with graphics set to high and FSR on balanced. If you spend time tweaking the settings, you really can get incredible performance out of the ROG Ally X.
I typically connect the controller and make these changes before connecting my ROG Ally X to my TV, especially if it’s the first time I’m using that controller with the handheld.
Another thing worth noting is that the ROG Ally X’s touchscreen doesn’t work when it’s docked, so settings you’d normally access that way require a mouse, a connected controller, or for you to use the handheld’s built-in controls, which likely won’t work unless you have a really long cable connected to it. To get around this issue, I use an Xbox Series X gamepad with the ROG Ally X when the handheld is still in portable mode. To make this happen, hold down the small button on the side of the top of the controller, and navigate to Settings on the ROG Ally X. Next, you’ll find Bluetooth in the left bar. Select Add Device and your controller should save (other gamepads have the same process — you just need to make sure they’re in syncing mode).
Once the controller is saved, the next time you turn it on, it’ll automatically connect to the ROG Ally X. Another important tip is to open the Command Center with the button just above the left d-pad and select Disable Embedded Controller before launching a game. In my experience, this forces most titles to default to your Bluetooth controls instead of the ROG Ally X’s built-in buttons. I typically connect the controller and make these changes before connecting my ROG Ally X to my TV, especially if it’s the first time I’m using that controller with the handheld.
If you’re running into sound output issues, tap the speaker icon at the bottom of Windows 11’s menu and select the
>
arrow beside the two dials. Here you can select the ROG Ally X’s sound output. I’ve had to do this a few times to make the handheld output sound properly to my Hisense U8H Mini-LED TV.

Related
4 reasons you don’t need a Switch 2 if you already own an ROG Ally X
Nintendo’s upcoming Switch 2 is impressive, but if you already own Asus’ handheld, you probably aren’t missing much.
Trending Products

AULA Keyboard, T102 104 Keys Gaming Keyboard and Mouse Combo with RGB Backlit Quiet Laptop Keyboard, All-Steel Panel, Waterproof Gentle Up PC Keyboard, USB Wired Keyboard for MAC Xbox PC Players

Acer Aspire 3 A315-24P-R7VH Slim Laptop computer | 15.6″ Full HD IPS Show | AMD Ryzen 3 7320U Quad-Core Processor | AMD Radeon Graphics | 8GB LPDDR5 | 128GB NVMe SSD | Wi-Fi 6 | Home windows 11 Residence in S Mode

Wireless Keyboard and Mouse Combo, Lovaky 2.4G Full-Sized Ergonomic Keyboard Mouse, 3 DPI Adjustable Cordless USB Keyboard and Mouse, Quiet Click for Computer/Laptop/Windows/Mac (1 Pack, Black)
ASUS RT-AX5400 Twin Band WiFi 6 Extendable Router, Lifetime Web Safety Included, Immediate Guard, Superior Parental Controls, Constructed-in VPN, AiMesh Appropriate, Gaming & Streaming, Sensible Dwelling

Logitech MK540 Superior Wi-fi Keyboard and Mouse Combo for Home windows, 2.4 GHz Unifying USB-Receiver, Multimedia Hotkeys, 3-12 months Battery Life, for PC, Laptop computer